Too basic to ask now? How to set GA4’s User-ID with GTM
*(The original article in Japanese was written by Yoshiko Ito, Digital Marketing Engineering of the Ayudante’s DME team. This article was translated by Gantuya Saruulbold.)
“I want to set up User-ID in GA4, but how should I do it?”
We received this question!
It’s something that seems simple but can be confusing —
So we’ve turned it into a quick column to help clear things up.
Reviewing User-ID
Google Analytics’ User-ID feature allows you to recognize the same user even when they visit your site across different devices or browsers.
Point 1
User-ID is not automatically assigned — you must send a user ID generated by your own system.
Point 2
You must comply with Google’s policies regarding the Analytics SDK and User-ID feature.
In particular, the following types of data cannot be used as a User-ID.
Make sure not to use data that violates policy. Instead, generate a unique ID on your site to identify users and set it as the User-ID.
Personally identifiable information is not allowed!
– Name
– Social Security Number
– Email address and similar data
Data that can permanently identify a specific device is also not allowed!
– Device identifiers that cannot be reset
Please make sure to review the help page before implementation.
Official Help: Google Analytics 4 SDK and User-ID Policy
Point 3
The User-ID sent to Google Analytics must be less than 256 characters.
Point 4
You cannot retroactively process or link previously collected and recorded Analytics account data to the User-ID once the feature is implemented.
Also, User-ID data collected in one property cannot be shared or merged with data from another property.
Let’s set it up in GTM
To track the User-ID in GA4, you can use either Google Tag Manager (GTM) or the Global Site Tag (gtag.js). In this case, we’ll use GTM for the setup.
Add it to the data layer
Before setting up GTM, make sure to configure the User-ID in the site’s data layer so it can be used in GTM.
Adding the data layer requires site modifications—ask your developer to handle this.
Point 1:
The data layer must be placed above the GTM container code.
Point 2:
It is recommended to hash the user_id.
window.dataLayer = window.dataLayer || [];
dataLayer.push({ ‘user_id’: ‘USER_ID’ });
Create a Data Layer Variable
- Open Google Tag Manager (GTM).
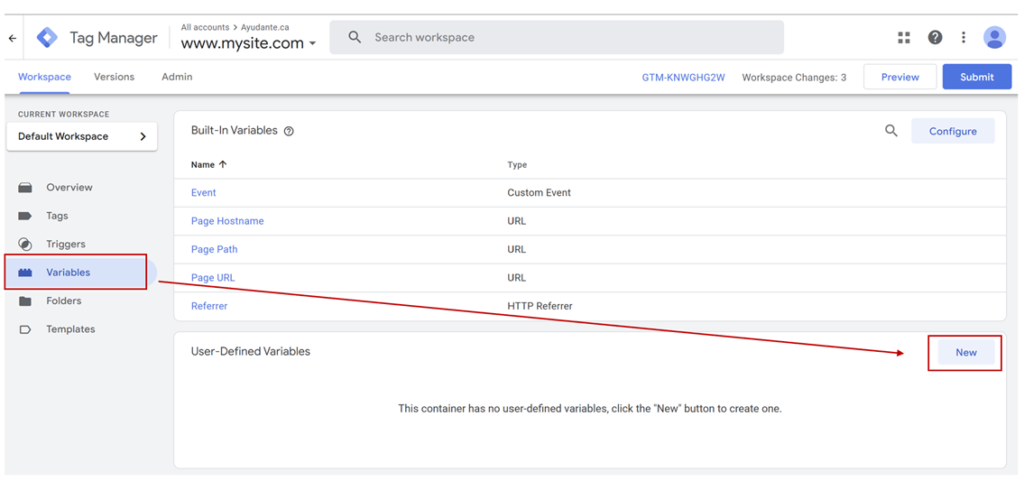
- Click on [Variables], then under [User-Defined Variables], click [New].

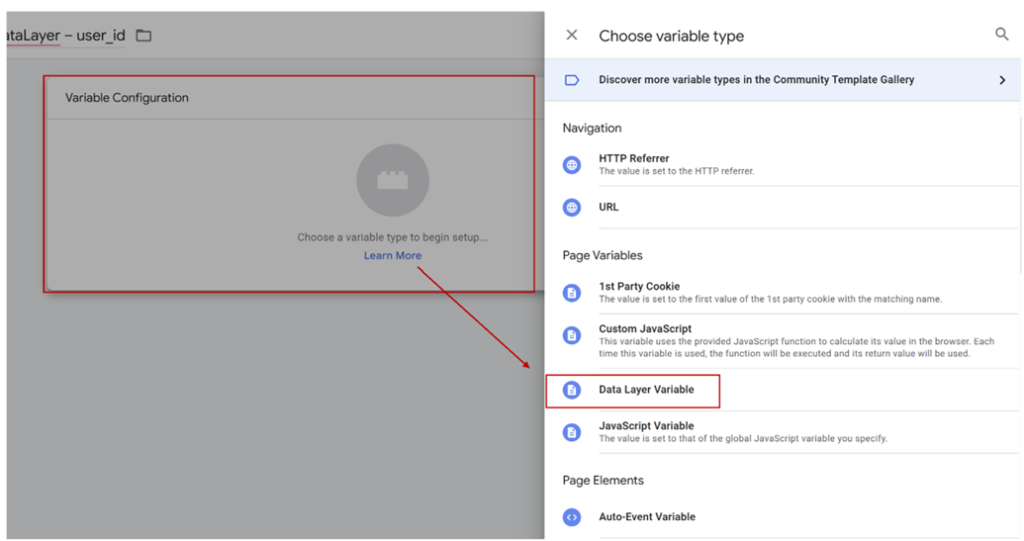
- Enter a name at the top for the variable (e.g., “dataLayer – user_id”).

- Click [Variable Configuration] > [Data Layer Variable].

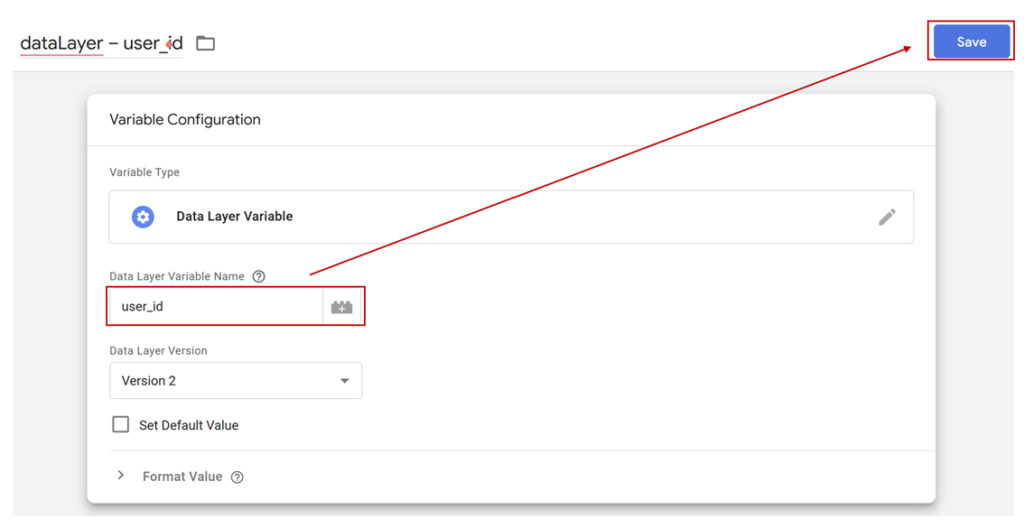
- In the [Data Layer Variable Name] field, enter the variable name (e.g., “user_id”), then click [Save]. Now, the user_id value output from the site’s dataLayer can be used in GTM.

Modify Google Tag
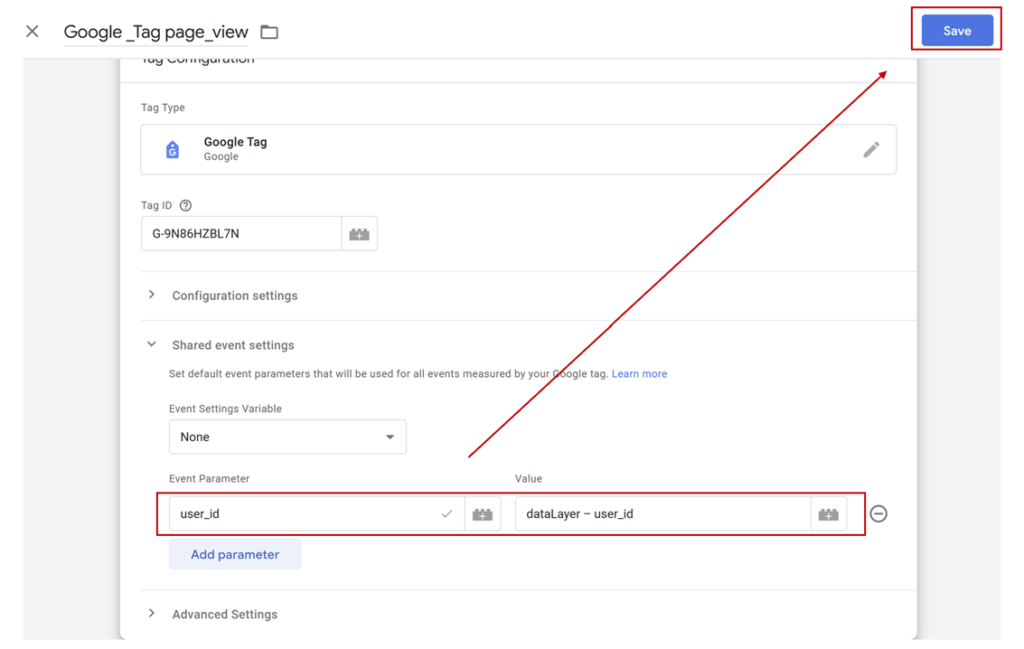
- Click [Tags], then select the Google Tag.

- Click [Shared Event Settings] > [Parameters] in order.

- Enter “user_id” as the event parameter, set the value to the variable you created earlier (e.g., “dataLayer – user_id”), and click [Save]. This completes the setup for setting the user_id.

Important Note
Sending a User-ID that can be directly linked to an individual to Google without the user’s consent is legally restricted, both domestically and internationally.
While the actual operation and legal interpretation should ultimately be left to the discretion of each company, this is a feature that can be risky if used carelessly—such as thinking, “We can send it technically, so let’s just do it!” It is important to discuss it internally, gain proper knowledge, and regularly review relevant policies.
Be sure to use it appropriately and in compliance with Google’s policies and applicable laws, as mentioned earlier in the “Review of User-ID” section.
In Conclusion
There are several types of user identification information, but the highest priority as a user identifier is the User-ID.
By sending a unique ID, you can accurately count the number of users and gain a comprehensive understanding of your users and your business.
This was a brief column, but I hope it proves helpful to you all.

