
How to integrate Google Analytics for Firebase in Android mobile app
(This post was originally posted by Vibhor Jain in our Japanese website, ayudante.jp)
Google Analytics for firebase platform is a powerful app measurement tool that allows one to monitor, track user engagement and behavior in mobile app (and the web app). With analytics, site wonders, advertisers can gain insights into how users interact with the app, which can help one to improve the app’s user experience and ultimately drive user engagement and growth.
In this guide I’ll give step-by-step guide on how to integrate analytics SDK into your Android app and get started with basics app reporting in Google Analytics
We will cover following ‘7’ steps
- Add / Register an Android app in Firebase project
- Download Firebase config file google-services.json
- Add a Firebase config file to your app
- Add project-level dependency
- Add module app-level dependency
- Initialize Analytics in your app
- Logging screen_view & other events to Analytics
Step 1: Add / Register an Android app in Firebase project
In the Firebase console, select your project → click the “Add app” button → select “Android”. Following screen will appear:

Enter the “Android package name” (I have chosen com.example.my_app.us.debug). Do note:
- You cannot change, modify the package name later. So choose wisely. Package name is what uniquely identifies your app (on device, Google Play Store, or any 3rd party app stores). This also appears in Google Analytics reports.
- If you already have an existing app, with possibly productFlavors (regional flavors ex. us / in / eu) and/or buildTypes (dev / debug / prod) block, register exactly the same name as the final “applicationId” of your final build variant.
Here we have added a “us” / “debug” app. Likewise if your project has 2x regional flavor (us / in), 3 build types (dev / debug / release, you might add 6 different apps
“App nickname” and “Debug signing certificate” is optional, you can leave it for the time being to keep things simple (it is possible to update these at later point if needed in order to use additional Firebase features)
Step 2: Download Firebase config file google-services.json
After you click “register app” button from previous step #1, you will be taken to the following screen to download the Firebase config file google-services.json file. This file simply maps each app “applicationId” to Firebase project ID and other Firebase project settings etc. so that the Firebase SDK knows which Analytics destination to send telemetry data to.
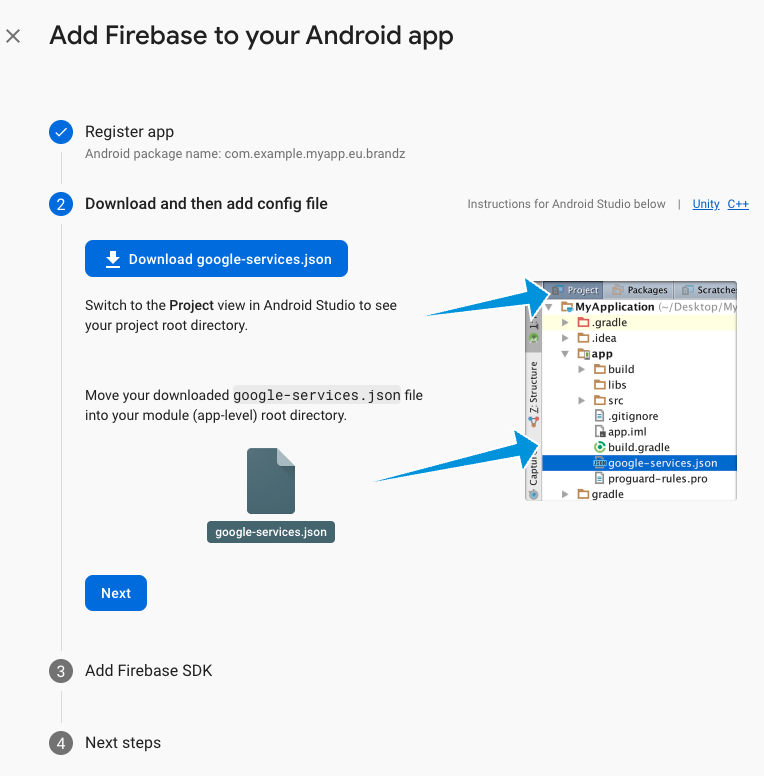
Download the file and save it for later use in steps below, and click “Next”
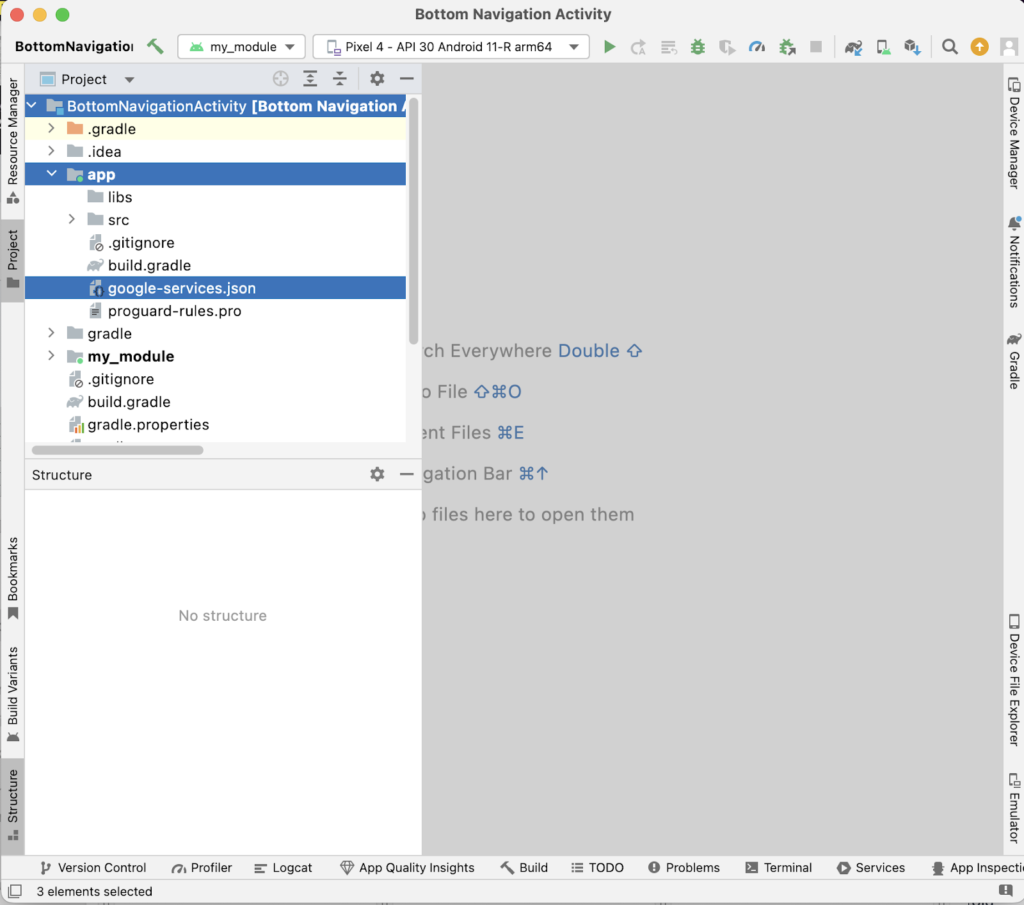
Step 3: Add a Firebase config file to your app
From this step onwards we move from the Firebase console to Android studio for the rest of the setup. Open app project files and move the google-services.json file to your Android app module directory (usually <project>/app/ directory).
So far we have done the basic preparation to integrate analytics to our mobile app, but haven’t yet started to integrate analytics SDK to our app. In order to do so, we will start to edit app source code files.
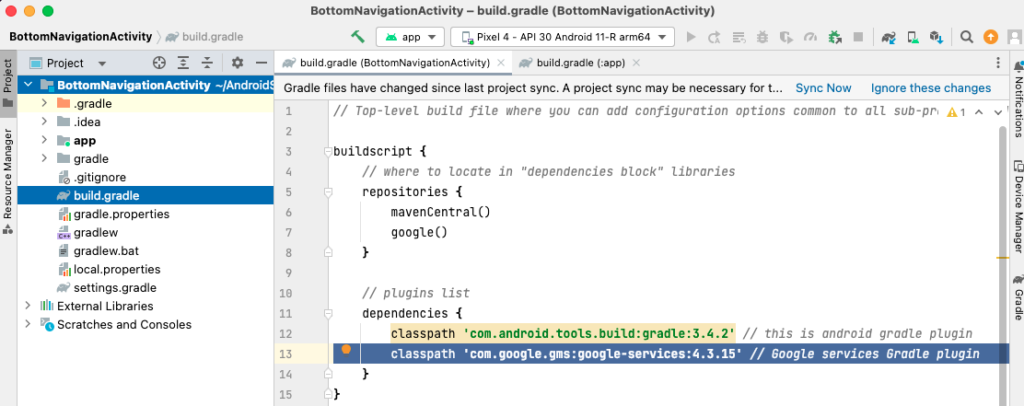
Step 4: add project-level dependency
In this step, we will add Google services Gradle plugin in order to make config values accessible to Firebase SDK. This plugin has serves two main purposes:
- process the google-services.json file and produce resources for use in application’s code.
- add necessary dependencies for libraries required for the Firebase services (for ex. Analytics) we enable in our app
Modify project-level Gradle file (usually /build.gradle file) and add this line of code to the dependencies block:
classpath ‘com.google.gms:google-services:4.3.15’
Step 5: add module app-level dependency
In this step, we apply google-services plugin that we included as dependency in previous step and any Firebase SDKs we want to use (Analytics library in our case)
Modify module app-level Gradle file (usually <project>/<app>/build.gradle file) to add following lines of code.
In the plugins block, add the following line of code
id 'com.google.gms.google-services'In the dependencies block, add the following line of code
// Import the Firebase BoM
implementation platform('com.google.firebase:firebase-bom:31.2.3')
// TODO: Add the dependencies for Firebase products you want to use
implementation 'com.google.firebase:firebase-analytics'
After we include these dependencies, apply the plugins and necessary SDKs, we can click the “Sync Now” link at the top bar (where Android Studio presents you with the message: “Gradle files have changed since the last project sync..”) to load the new dependencies locally.
By now, we’ve integrated Firebase SDK with Analytics service into our app
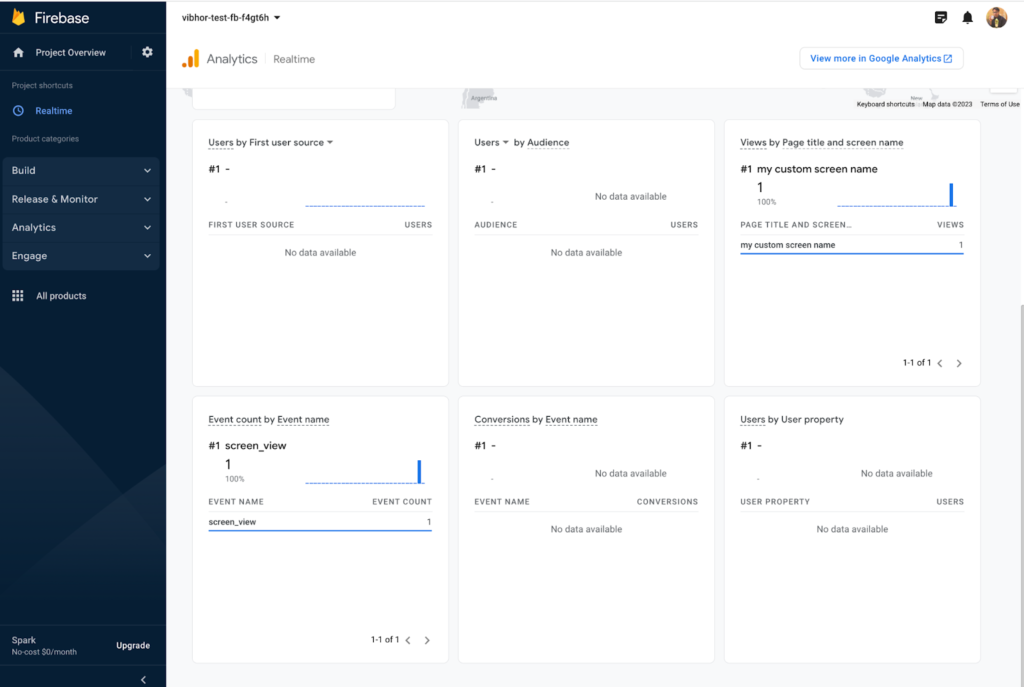
At this point if you click Run → Run “app” you can already see firebase automatically logs first_visit, session_start, screen_view events (look at your Logcat window and filter to firebase events only).
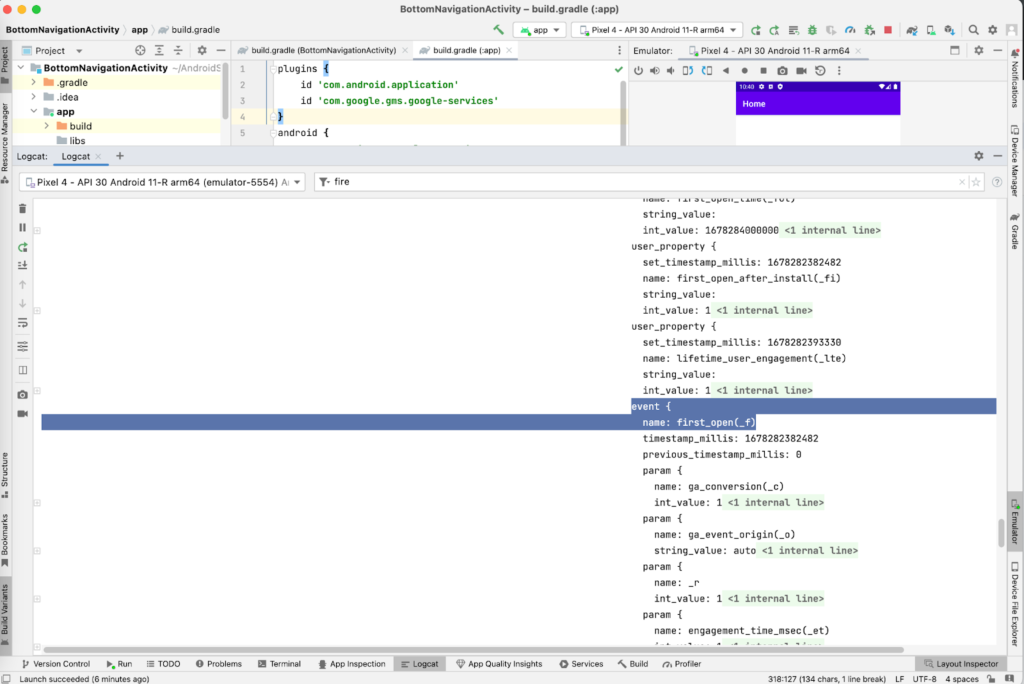
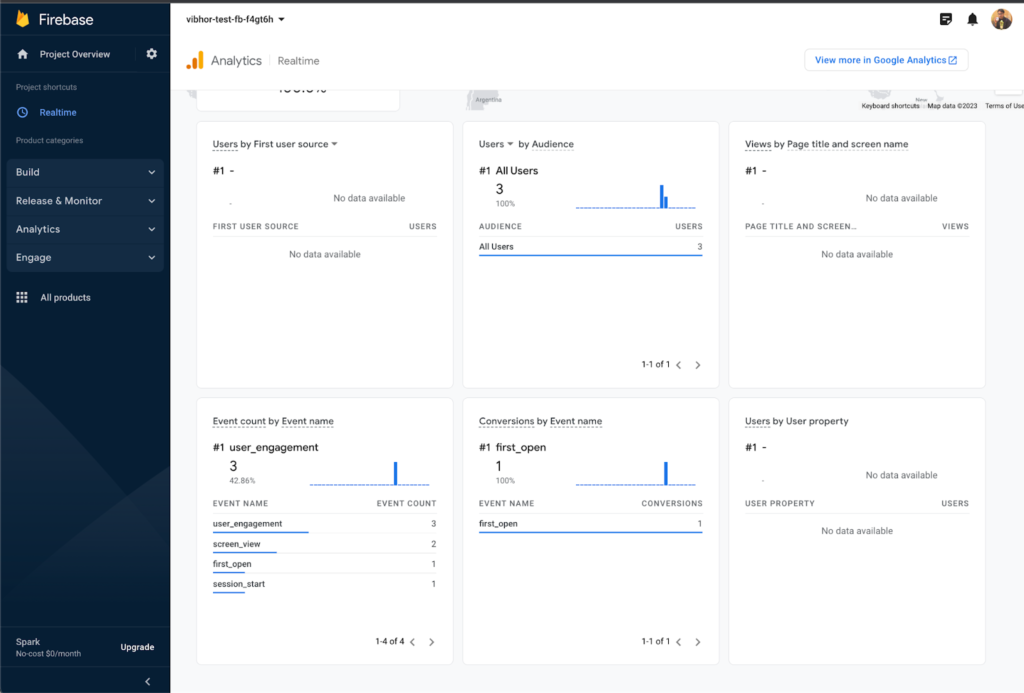
Events logged are also visible in Analytics Real Time reports
In subsequent steps, we will initialize Analytics in the app and start tracking events originating from user integration within our app
Step 6: Initialize Analytics in your app
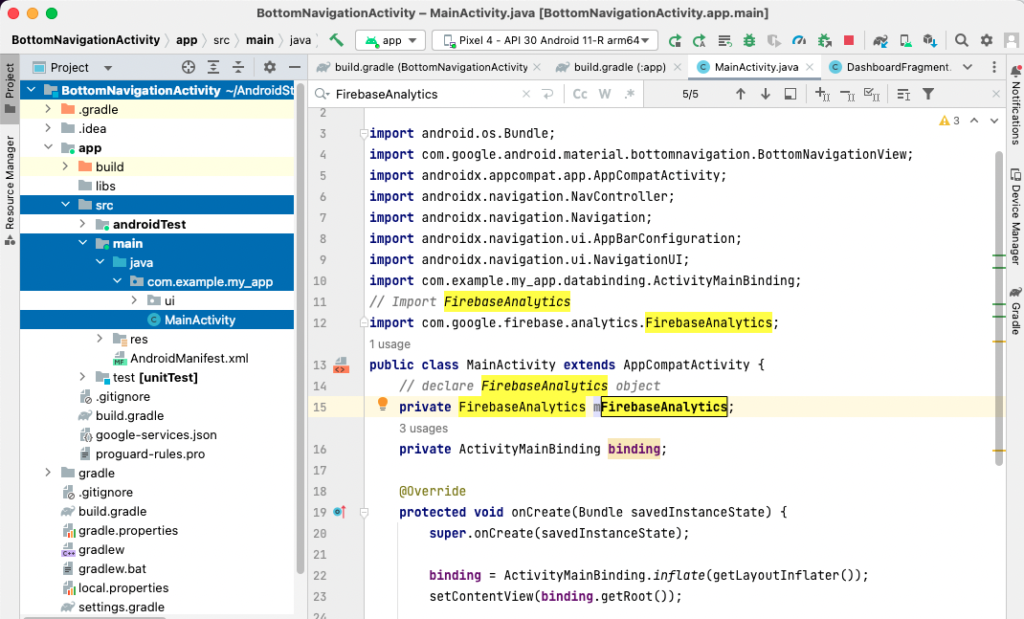
Open your activity .java source file (usually /app/src/main/java/<project>) and add the import statement at the top of your activity class file
import com.google.firebase.analytics.FirebaseAnalytics;And then, declare FirebaseAnalytics object at the top of your activity class:
private FirebaseAnalytics mFirebaseAnalytics;This will initialize instances of the FirebaseAnalytics class in our app and we can begin to use a logEvent() method of this class to log events.
Step 7: Logging screen_view & other events to Analytics
After initializing a FirebaseAnalytics instance in your app code, you can use the library’s standard logEvent() to log screen_view or any other recommended or custom event parameters.
For example, in order to log screen_view events, open your activity class file → locate onResume() method (or any other Android LifeCycle callback methods onCreate(), onStart(), onResume() etc. at which instance you’d like to log a screen_view event as per business requirements). → and add the following code
Bundle bundle = new Bundle();
bundle.putString(FirebaseAnalytics.Param.SCREEN_CLASS, "my screen classs");
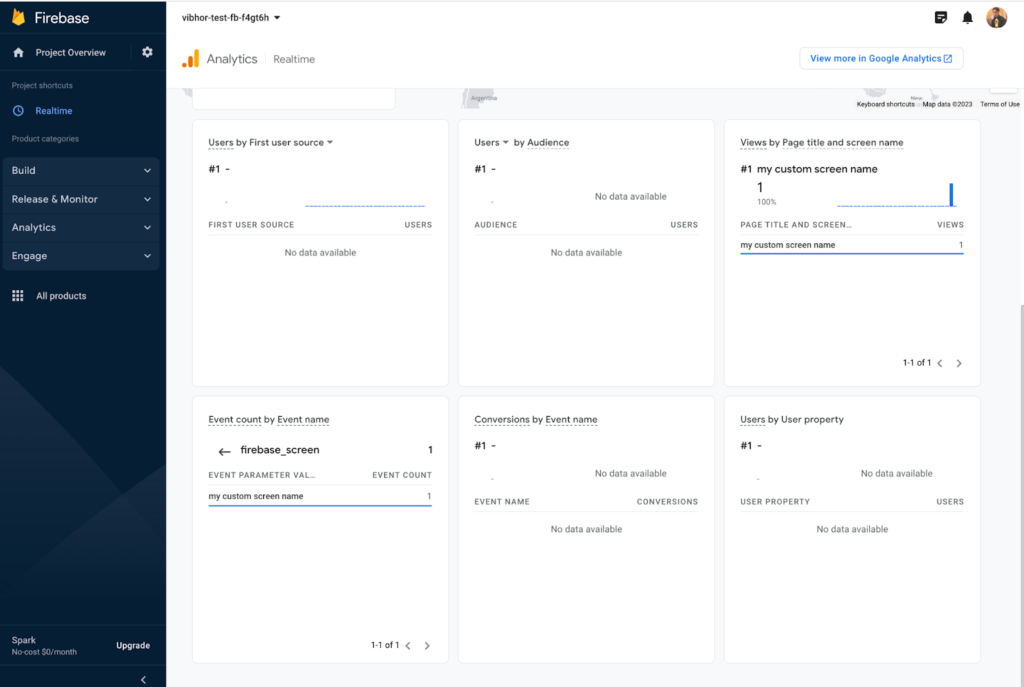
bundle.putString(FirebaseAnalytics.Param.SCREEN_NAME, "my custom screen name");
mFirebaseAnalytics.getInstance(this).logEvent(FirebaseAnalytics.Event.SCREEN_VIEW, params);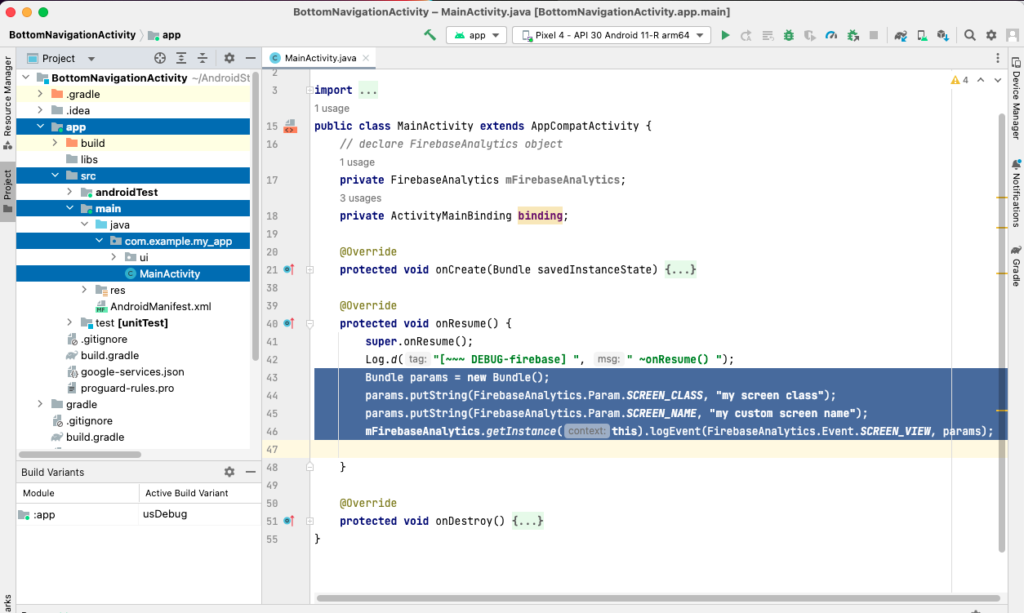
Here, we’re also setting “screen_class” and “screen_name” parameters to our own liking (as we’d like to see in Analytics reports). Otherwise, by default Analytics library logs activity class name (ex. MainActivity) as a screen name which is not super helpful when looking at reports.
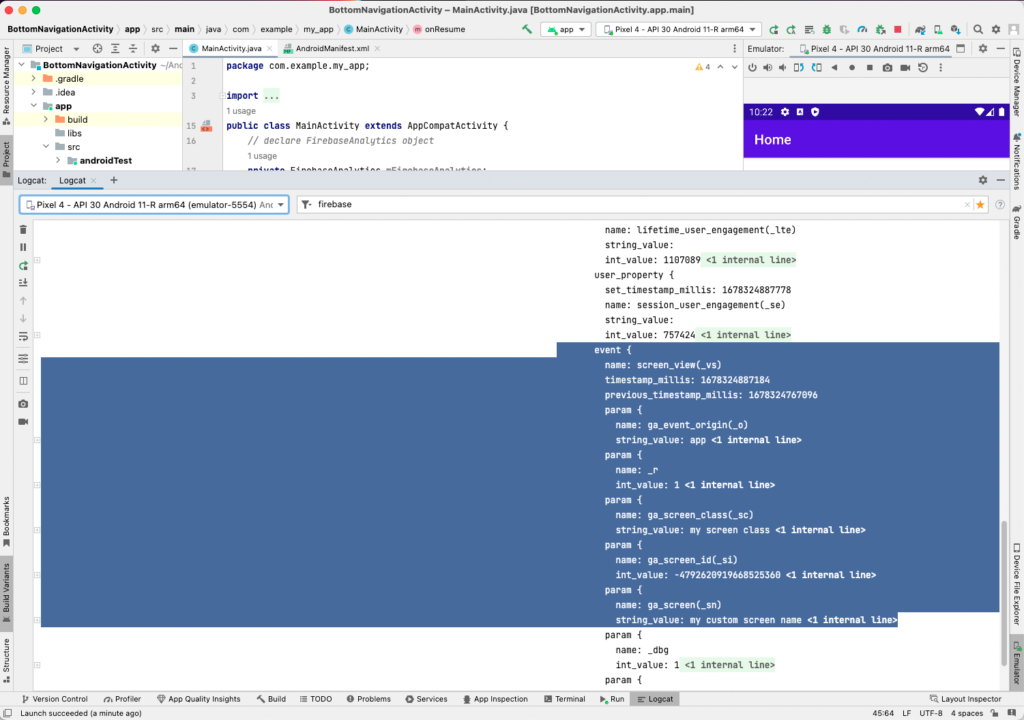
Now you launch the app, we can see a screen_view event being logged
Likewise you can log any custom event using the same logEvent() class method whenever the user takes a desired action within an app (ex. purchase, register, login, button clicks etc)
Lastly, Firebase automatically tracks screen_view events when screen transition happens, together with screen information (screen class, screen id etc.). However, from experience, timing of these events and the screen names are not very intuitive for the business, therefore it is recommended to disable automatic screen_view tracking and have full control over screen_view tracking by manually logging the events using logEvent() method as described above. Automatic screen_view tracking can be disabled by adding the following line of code within the <application> tag of the AndroidManifest.xml file:
<meta-data android:name="google_analytics_automatic_screen_reporting_enabled" android:value="false">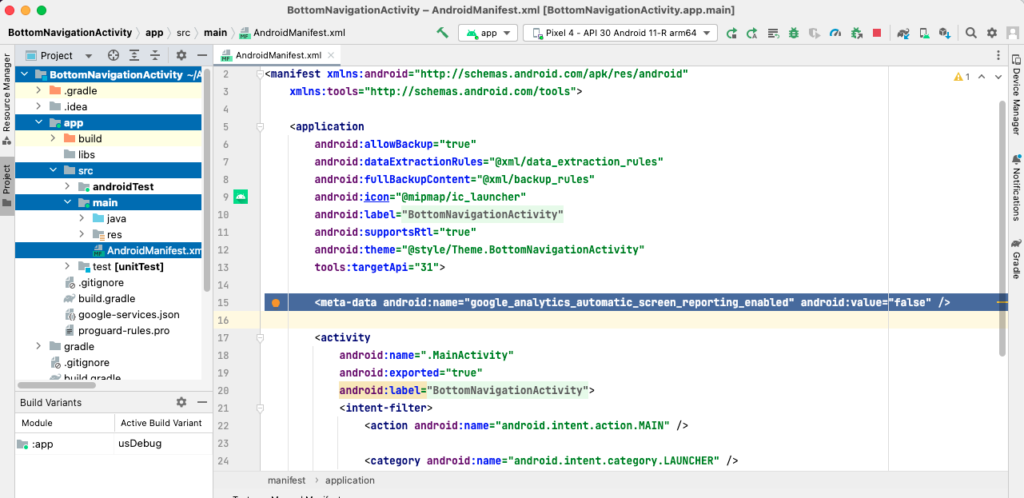
To conclude, Google Analytics for Firebase is a powerful tool that can help you gain insights into how users are interacting with your Android app. By following the above steps, you can easily implement Analytics in your Android app and start tracking user engagement and behavior.
I hope you will find this useful.